Battery switch on travel trailer function is crucial for managing your RV’s power. This guide dives into the hows and whys of these switches, covering different types, safe connection procedures, troubleshooting tips, and essential maintenance. We’ll explore how the battery switch interacts with your trailer’s electrical system and offer advice on choosing and installing the right one for your needs.
Get ready to become a battery switch expert!
Understanding your travel trailer’s battery switch is key to preventing electrical problems and ensuring reliable power for your adventures. From safely connecting and disconnecting your batteries to troubleshooting common issues and performing routine maintenance, this guide provides a comprehensive overview, empowering you to confidently manage your RV’s electrical system. We’ll cover everything from basic operation to advanced troubleshooting, ensuring you’re equipped to handle any situation.
Connecting and Disconnecting Batteries
Properly connecting and disconnecting your travel trailer batteries is crucial for safety and to ensure the longevity of your battery system. Improper handling can lead to sparks, corrosion, and even injury. This section Artikels the correct procedures and highlights important safety precautions.
Before you begin any work on your batteries, always remember to prioritize safety. Battery acid is corrosive and hydrogen gas, produced during charging, is highly flammable. Working in a well-ventilated area is essential to minimize the risks.
Battery Connection Procedure
Connecting your batteries involves carefully attaching the positive (+) and negative (-) cables to the battery terminals. Always start with the positive connection and finish with the negative. This minimizes the risk of accidental short circuits.
- Ensure the battery switch is in the OFF position.
- Clean the battery terminals and cable ends with a wire brush to remove any corrosion. A baking soda and water paste can help neutralize any acid buildup.
- Connect the positive (+) cable clamp to the positive (+) terminal of the battery. Tighten the clamp securely, but avoid over-tightening.
- Connect the negative (-) cable clamp to the negative (-) terminal of the battery. Again, tighten securely but avoid over-tightening.
- Turn the battery switch to the ON position.
Battery Disconnection Procedure
Disconnecting your batteries is the reverse of the connection process. Again, safety is paramount. Always disconnect the negative cable first to prevent short circuits.
- Turn the battery switch to the OFF position.
- Disconnect the negative (-) cable clamp from the negative (-) terminal.
- Disconnect the positive (+) cable clamp from the positive (+) terminal.
- Clean the battery terminals and cable ends to prevent corrosion.
Hazards of Improper Battery Handling
Improperly connecting or disconnecting batteries can lead to several serious hazards. These include:
- Sparks and Fires: A short circuit can generate significant sparks, potentially igniting flammable materials nearby.
- Battery Acid Burns: Accidental spills of battery acid can cause severe chemical burns to skin and eyes.
- Hydrogen Gas Explosion: Hydrogen gas, released during charging, is highly explosive and can ignite if exposed to a spark or flame.
- Damage to Electrical Systems: Improper connections can damage sensitive electronic components in your travel trailer.
Battery Terminal and Connection Maintenance
Regular maintenance of your battery terminals and connections is vital for preventing corrosion and ensuring reliable performance. This involves:
- Regularly inspecting the terminals and cables for corrosion. Clean them with a wire brush and baking soda paste as needed.
- Applying a corrosion inhibitor to the terminals to prevent future corrosion. Many automotive stores sell specialized products for this purpose.
- Checking the tightness of the cable clamps periodically to ensure a secure connection.
Appropriate Tools and Safety Equipment
Using the correct tools and safety equipment is essential for safe battery handling. This includes:
- Wire brush: For cleaning battery terminals.
- Baking soda and water: To neutralize acid buildup.
- Corrosion inhibitor: To prevent future corrosion.
- Safety glasses: To protect your eyes from battery acid splashes.
- Gloves: To protect your hands from acid and corrosion.
Troubleshooting Common Battery Switch Issues

Your travel trailer’s battery switch is a crucial component, ensuring you can seamlessly switch between your house batteries and your tow vehicle’s charging system. Problems with this switch can leave you with a dead battery and a frustrating camping experience. This section will guide you through troubleshooting common issues, helping you get back on the road quickly.
Battery Switch Troubleshooting Flowchart
A visual flowchart can simplify the diagnostic process. Imagine a flowchart starting with the question “Are the batteries charged?” If no, check the charging system. If yes, proceed to check if the switch is in the correct position. If the switch is correct but the batteries still don’t work, check the switch itself for proper operation using a multimeter (detailed below).
So, you’re prepping for a road trip in your awesome travel trailer? First things first: make sure you understand the battery switch on travel trailer function – it’s crucial for managing your power. Once that’s sorted, think about setting up your entertainment. A killer audiophile travel setup can really elevate the experience, transforming those long drives into mini-concerts.
Just remember to pack accordingly – both for power and your precious audio gear!
If the switch is faulty, replacement is needed. If the switch is working correctly, check for blown fuses or other wiring issues. This process eliminates potential problems one by one, leading to a quick solution.
Common Battery Switch Problems, Causes, and Solutions
The following table summarizes common problems, their root causes, and how to resolve them. Prevention strategies are also included to minimize future occurrences.
So, you’re gearing up for a road trip in your travel trailer? Awesome! First things first: make sure you understand your battery switch on travel trailer function , because you don’t want to be stuck without power. Once that’s sorted, let’s talk tunes! For the serious music lover, setting up an audiophile travel setup is key for enjoying your favorite albums on the road.
It’s all about prioritizing what’s important for your trip; power and great sound!
| Problem | Cause | Solution | Prevention |
|---|---|---|---|
| No power to house batteries | Switch in the wrong position; blown fuse; faulty switch; corroded connections | Check switch position; replace fuse; test switch with multimeter (see below); clean and tighten connections | Regularly inspect connections; check fuses before each trip; replace the switch if it shows signs of wear. |
| Intermittent power to house batteries | Loose connections; corroded switch contacts; failing switch | Tighten all connections; clean switch contacts; replace the switch | Use anti-corrosion grease on connections; regularly inspect the switch for corrosion. |
| Batteries draining quickly | Parasitic drain; faulty appliance; switch not completely off | Check for parasitic draws using a multimeter; repair or replace faulty appliance; ensure switch is fully off | Regularly inspect appliances for proper operation; use a battery disconnect switch when not in use. |
| Switch is stuck | Corrosion; mechanical failure | Clean switch contacts with a wire brush and contact cleaner; replace the switch | Use dielectric grease on switch contacts; regular inspection and lubrication. |
Testing the Battery Switch with a Multimeter
To test the switch, you’ll need a multimeter. First, ensure the switch is in the “off” position. Set your multimeter to the continuity test setting (usually represented by a diode symbol). Touch the probes to the terminals on either side of the switch. There should be no continuity (the multimeter should not beep).
Next, switch the switch to the “battery” position. There should be continuity (the multimeter should beep) indicating a complete circuit. Repeat this process for the “tow vehicle” position, ensuring the circuit is complete when switched to that position. Lack of continuity in any position indicates a faulty switch. Remember to always disconnect the battery before working with electrical components.
Symptoms of a Faulty Battery Switch and Differentiation from Other Electrical Issues
A faulty battery switch might manifest as complete lack of power to the house batteries, intermittent power loss, or an inability to charge the batteries properly. These symptoms can be similar to blown fuses, faulty wiring, or problems with the charging system. To differentiate, systematically check fuses, wiring connections, and the charging system before concluding the battery switch is at fault.
The multimeter test (described above) is crucial for confirming the switch’s functionality and isolating it as the problem source. If all other components test fine, a faulty switch is the most likely culprit.
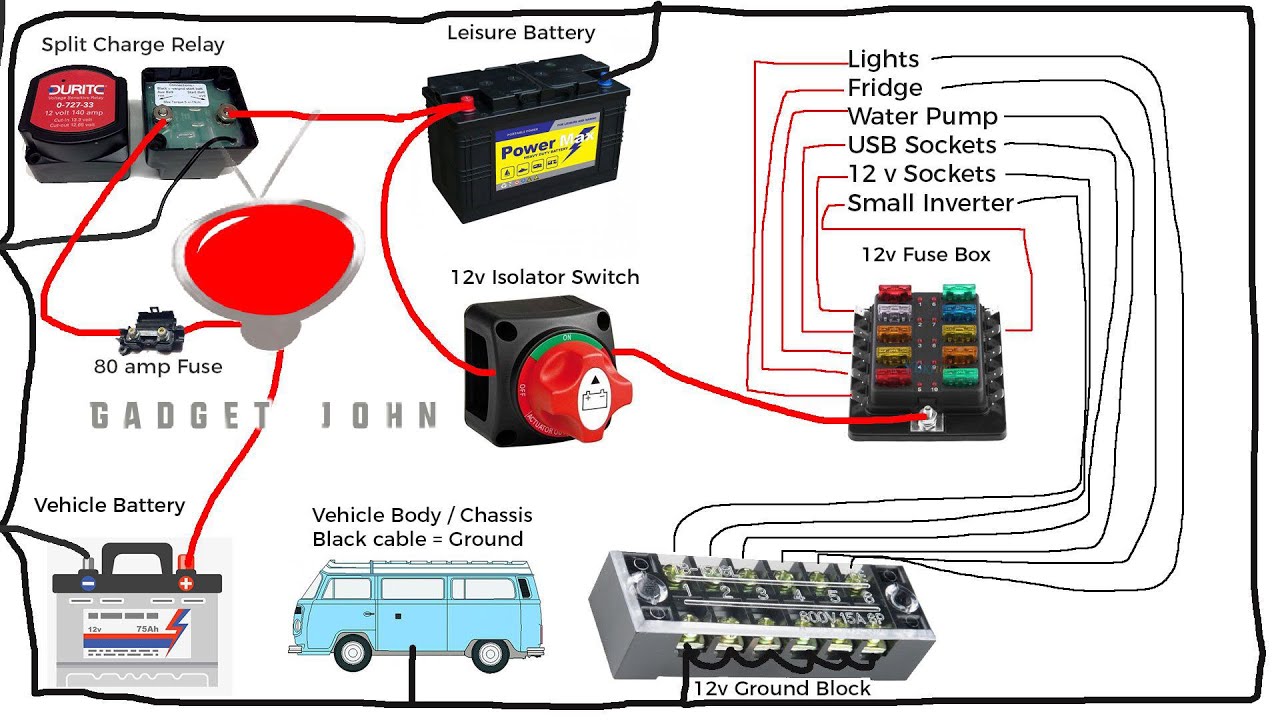
Battery Switch and Electrical System Integration
Your travel trailer’s battery switch is the central nervous system of your power distribution, connecting and disconnecting your house batteries from the rest of the electrical system. Understanding its role is crucial for safe and efficient power management. This section details how the switch interacts with other key components and the consequences of malfunction.The battery switch acts as a gatekeeper, controlling the flow of power between your trailer’s house batteries and the other electrical components.
When the switch is in the “on” position, power from the house batteries can flow to the converter, inverter, and other 12V appliances. Conversely, the “off” position isolates the batteries, preventing accidental discharge or potential short circuits. The interaction with the tow vehicle’s charging system also depends on the switch’s position, typically requiring the switch to be “on” to charge the house batteries while driving.
Power Flow Management
The battery switch manages power flow primarily between the house batteries and the rest of the 12V system. When the switch is engaged, the batteries provide power to the converter, which steps up the 12V DC power to 120V AC for your household appliances. The inverter also draws power from the batteries, converting 12V DC to 120V AC for specific devices.
A typical setup would see the battery switch as the initial point of power distribution for the 12V DC system, and thus any issues with the switch will directly affect the function of all downstream components.
Simplified Electrical Diagram
Imagine a simple diagram: Two house batteries are connected to one side of the battery switch. The other side of the switch connects to a distribution bus bar. From this bus bar, multiple wires branch out to various components. One wire goes to the converter, another to the inverter, and others to 12V lights and appliances. A separate wire connects the bus bar to the tow vehicle’s charging system.
The battery switch acts as the single point of control, allowing or preventing current flow through this entire circuit. If the switch is off, the circuit is broken, and no power flows from the batteries to the trailer’s systems.
Impact of a Malfunctioning Battery Switch
A faulty battery switch can cause a range of problems. For example, a switch that is stuck in the “on” position could lead to a complete discharge of your house batteries, even when not connected to the tow vehicle. Conversely, a switch stuck in the “off” position will prevent your batteries from charging while connected to the tow vehicle and leave you without power for your 12V appliances.
Furthermore, an internally shorted switch could create a dangerous situation, potentially causing overheating or even a fire. A malfunctioning switch could also lead to intermittent power loss, affecting your ability to operate lights, appliances, or other equipment reliably. This is why regular inspection and proper maintenance of your battery switch are so critical.
Maintenance and Safety Precautions
Keeping your travel trailer’s battery switch and electrical system in top shape is crucial for reliable power and safe operation. Regular maintenance prevents problems and extends the life of your components, while understanding the safety hazards involved protects you from injury.Proper maintenance and safety awareness are paramount when dealing with your RV’s electrical system. Neglecting these aspects can lead to malfunctions, damage, and even personal injury.
This section Artikels essential practices for maintaining your battery switch and related components, as well as crucial safety precautions to observe.
Battery Switch Maintenance Schedule
A regular maintenance schedule ensures your battery switch functions correctly and prevents premature failure. This schedule should be incorporated into your overall RV maintenance routine.
- Monthly Inspection: Visually inspect the switch for any signs of damage, loose connections, or corrosion. Check the surrounding area for any signs of overheating or unusual wear.
- Semi-Annual Cleaning: Clean the switch contacts with a wire brush or contact cleaner, removing any accumulated dirt or debris. This helps ensure a clean and reliable connection.
- Annual Deep Inspection: Perform a thorough inspection, including checking all wiring connections to the switch and the batteries themselves. Tighten any loose connections and replace any damaged or corroded components.
Safety Hazards Associated with Electrical System Work, Battery switch on travel trailer function
Working with electrical systems carries inherent risks. Understanding these hazards and taking appropriate precautions is essential to prevent accidents.
- Electrical Shock: Direct contact with live wires can cause serious injury or death. Always disconnect power before working on any electrical component.
- Battery Acid Burns: Battery acid is corrosive and can cause severe burns to skin and eyes. Wear appropriate eye protection and gloves when handling batteries.
- Fire Hazard: Sparks or short circuits can ignite flammable materials. Keep the work area clear of combustible materials.
- Gas Buildup: Batteries release hydrogen gas, which is highly flammable and explosive. Ensure adequate ventilation when working with batteries.
Inspecting Battery Connections for Corrosion
Corrosion on battery terminals is a common problem that can lead to poor connections, reduced battery performance, and even fire hazards. Regular inspection and cleaning are crucial.Corrosion typically appears as a white, green, or blue powdery substance on the terminals. It can be easily removed with a wire brush, baking soda paste, and water. After cleaning, apply a corrosion inhibitor to prevent future buildup.
A simple visual check during your monthly inspection is all it takes to identify this problem early.
Using Appropriate Personal Protective Equipment (PPE)
Appropriate PPE is vital when working with batteries and the electrical system. This protects you from potential hazards and ensures your safety.
- Safety Glasses or Goggles: Protect your eyes from battery acid splashes and flying debris.
- Rubber Gloves: Protect your hands from battery acid and electrical shock.
- Insulated Tools: Use insulated tools to prevent electrical shock when working on live components.
Battery Switch Selection and Installation: Battery Switch On Travel Trailer Function
Choosing and installing the right battery switch is crucial for managing your travel trailer’s power effectively and safely. A well-selected switch ensures reliable power distribution between your house and chassis batteries, while proper installation prevents electrical issues and potential hazards. This section details the process of selecting and installing a battery switch, guiding you through the necessary steps and considerations.
Battery Switch Brands and Models
Several reputable brands offer battery switches for RVs, each with varying features and price points. Popular choices include Blue Sea Systems, Perko, and Progressive Dynamics. Blue Sea Systems, for example, offers a wide range of switches, from simple single-pole, double-throw (SPDT) switches to more complex models with multiple circuits and remote control capabilities. Perko switches are known for their robust construction and marine-grade durability, often favored in harsh environments.
Progressive Dynamics focuses on integrated power management systems, frequently incorporating battery switches into their larger solutions. When comparing models, consider the number of batteries you need to manage (two, three, or more), the amperage rating (which should exceed your battery’s capacity), and the desired features like illuminated switches or remote control options. Selecting a switch with a higher amperage rating than necessary provides a safety margin.
Selecting the Appropriate Battery Switch
The selection process depends heavily on your travel trailer’s specific electrical system. First, determine the number of batteries you’ll be using. Most travel trailers utilize two batteries: one for chassis functions (starting the vehicle) and one for house functions (lights, appliances). If you have a larger trailer or require additional power, you might have three or more batteries.
Next, assess the amperage requirements of your house and chassis systems. This information is typically found in your trailer’s electrical schematics or documentation. The switch’s amperage rating must exceed the highest current draw anticipated from your system. For example, if your house battery system draws a maximum of 100 amps, choose a switch with a higher amperage rating, such as 150 amps, to ensure sufficient capacity and prevent overheating.
Finally, consider the desired features. A simple on/off switch is sufficient for basic setups, but more complex systems may benefit from a switch with remote control or multiple circuits.
Step-by-Step Battery Switch Installation
Installing a new battery switch requires careful planning and execution to ensure electrical safety. Always disconnect the negative terminals of both batteries before starting any work.
- Plan the Location: Choose a location that provides easy access for operation and maintenance, preferably within a well-ventilated area.
- Prepare the Wiring: Measure and cut the necessary lengths of appropriately sized battery cables. Use crimp connectors or solder connections to ensure secure and corrosion-resistant joints. Properly sized wiring is crucial for safe and efficient operation.
- Mount the Switch: Securely mount the battery switch to a sturdy surface using appropriate fasteners.
- Connect the Wiring: Connect the battery cables to the switch terminals, following the manufacturer’s instructions carefully. Double-check all connections to prevent loose wires or incorrect wiring.
- Reconnect Batteries: Carefully reconnect the negative terminals of both batteries.
- Test the System: Test the switch by turning it on and off, ensuring all systems are functioning correctly. Verify the switch operates without overheating or unusual noises.
Tools and Materials
Proper tools and materials are essential for a safe and successful installation.
- Appropriate sized battery cables
- Crimp connectors or soldering iron and solder
- Wire strippers and cutters
- Screwdrivers (Phillips and flathead)
- Drill and drill bits (if necessary)
- Wrench set
- Voltmeter or multimeter for testing
- Safety glasses and gloves
- Battery switch of appropriate amperage and configuration
- Mounting hardware
Understanding Battery Switch Wiring Diagrams
Wiring diagrams for battery switches in travel trailers might seem daunting at first, but they’re actually quite straightforward once you understand the conventions. These diagrams are essential for troubleshooting, installation, and maintenance of your trailer’s electrical system. They visually represent the flow of electricity and the connections between different components.Understanding common symbols and their meanings is key to interpreting these diagrams.
This section will cover the basics, showing you how to read and understand a typical travel trailer battery switch wiring diagram.
Common Symbols and Notations
Battery switch wiring diagrams utilize standardized symbols for clarity and consistency. Common symbols include:
Battery: Often represented by a series of parallel lines (+ and – terminals clearly marked).
Battery Switch: Typically shown as a square or rectangle with input and output terminals clearly labeled (e.g., “In,” “Batt 1,” “Batt 2,” “Out”).
Fuses: Represented by a circle with a zig-zag line inside.
Wiring: Lines connecting the components, with different thicknesses or styles potentially indicating wire gauge or function.
Ground: Often depicted as a triangle or a ground symbol.
Loads (lights, appliances): Often shown as a simple rectangle with the device name next to it.
Sample Wiring Diagram and Wire Color Interpretation
Let’s consider a typical dual-battery setup with a battery switch.
Imagine a diagram showing two batteries (Battery 1 and Battery 2), each with positive (+) and negative (-) terminals. These connect to the input terminals of a battery switch. The switch itself has output terminals that lead to the trailer’s main electrical panel, often via a fuse. The negative terminals of both batteries are also connected to the trailer’s chassis ground.
Wire colors are often used to indicate specific functions:
Positive (+) wires are frequently red or sometimes orange. Negative (-) wires are commonly black or sometimes blue. Ground wires are typically green or bare copper.
Different manufacturers may vary slightly, so always consult your specific trailer’s wiring diagram.
Visual Representation of a Battery Switch Wiring Diagram
Let’s describe a visual representation, assuming a typical dual-battery setup with a battery switch:
The diagram would begin with two battery symbols, Battery 1 and Battery 2, each clearly labeled with + and – terminals. Red wires would connect the + terminals of each battery to the “Batt 1” and “Batt 2” input terminals of the battery switch (a rectangular symbol). A black wire connects each battery’s – terminal to the trailer’s chassis ground (represented by a ground symbol). A single red wire from the “Out” terminal of the battery switch would then lead to a fuse (circular symbol with zig-zag), and from the fuse, a red wire would connect to the positive bus bar of the trailer’s main electrical panel. All negative connections are routed through the trailer’s ground system.
Each component is clearly labeled, and the wires connecting them are shown with their respective colors. The diagram shows the path of positive and negative currents from the batteries, through the switch, and to the trailer’s electrical system. Arrows might be included to show the direction of current flow.
Mastering your travel trailer’s battery switch is a game-changer for any RV owner. By understanding its function, performing regular maintenance, and knowing how to troubleshoot problems, you’ll ensure reliable power and prevent costly repairs. This guide has equipped you with the knowledge to confidently manage your RV’s electrical system, allowing you to focus on enjoying your adventures without worrying about power outages.
Safe travels!
User Queries
What happens if I leave my battery switch on all the time?
Leaving your battery switch on constantly can drain your batteries, especially if you have parasitic draws from devices left plugged in. It’s best to turn it off when not using the trailer for extended periods.
How often should I inspect my battery terminals?
Inspect your battery terminals at least every three months for corrosion. Clean them as needed to maintain a good connection.
Can I use a regular car battery in my travel trailer?
While you
-can*, it’s generally not recommended. Deep-cycle batteries designed for RVs are better suited for the demands of extended use and multiple cycles.
My battery switch is making a clicking sound. What’s wrong?
A clicking sound often indicates a faulty switch or a low battery voltage. Check your battery voltage and consider replacing the switch if necessary.
